
Review
Looking back at my first year’s project I used mostly simple geometry just a lot of it to give the illusion of detail and complexity. Throughout this year I focused on improving my modelling in making smooth and curved surfaces that are more prevalent in the world. My texturing skills were limited to using ready-made textures and experimenting with Maya materials; I’ve heavily improved in texturing as I now use substance painter and crazy bump to create my own custom textures that have appropriate scratches and multiples layers of nodes to create a realistic model.
My skillset in Maya has expanded greatly to cover smooth modelling, rigging to improve workflow, node management in hypershade and many more sections. Before my aim was to get into a prestigious game company and create realistic looking models, however this year changed my perspective of where I want to specialize within the industry; I chose to specialize in creating models and textures as close to photorealism as possible. If I go into the games industry I will be limited in how realistic I can make everything look, whereas if I go into the VFX industry they require you to make photo real models as it has to blend well with the actors.
Concept
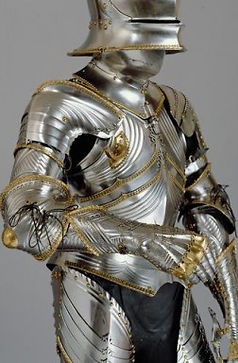
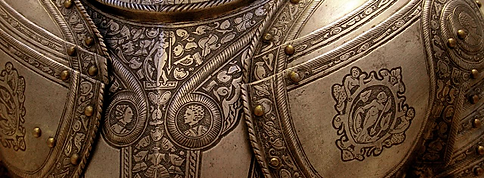
My plan is to create a museum exhibition room as highly detailed as possible, this includes wood carvings on pedestals, etchings on armours, and scratching on weapons. Just like my last year’s final major I aim to make this as realistic as possible, but this time with my expanded knowledge of different software I can create much more realistic materials and therefore environments. I will use substance painter which I found through independent research for intricate models like the objects on display, and I’ll use several different techniques to create recurring textures like the floor panels, which include crazy bump. I plan on displaying the project as an architectural visualization with low panning shots of the scene and some abstract camera angles to emphasize craftsmanship. Since I have more time on this project I made sure that there will always be something I can add such as more pedestals with medieval weaponry. I’m inspired by the intricate craftsmanship of an Italian armour craftsman Filippo Negroli who’s considered to be one of the best armourers of all time, he creates armour fit for Kings to represent wealth rather than being efficient in battle. The aim of the project is to make it able to blend with real actors that would be put in the scene in post-production by vfx artists, this is to help me understand the industry I’m aiming for.
I’ll model in Maya as the program has all the tools to cover any type of modelling technique. Currently Arnold is the render engine that most companies use and therefore I will render using Arnold, this will improve my knowledge of industry standards and ultimately increase my chances of getting into the industry. I will use Substance Painter by algorithmic to texture intricate models professionally. For models that cover a large area and use a recurring texture I’ll use crazy bump to produce specular, displacement and f0 maps. I’ll start with making the etchings on the wood as it’ll set a good baseline on how detailed I want my models to be.
Methods
My project will be evaluated on its attention to detail, how accurate it is to reality and on the presentation of work. The work must imitate professionalism. I will regularly post progress of my work on my blog and compare it to the time frames I set out for myself. To get to company that does realistic 3d models I have to be good as them, therefore I will be comparing myself to professional works but still keeping in mind that I still have to go through University where I’ll improve greatly. Poly count isn’t a massive issue as it won’t be going into real time render engines, but also not to go over the top as movie render times are optimized to shorten years of render time. My work must emulate reality without showing any glaring signs of computer imagery such as overused recurring textures and texture seams. To call my project completed I must have at least the armour, and the museum room done with its appropriate podiums.
Evaluation
Final Major Project

Battlefield Hardline, California, United States: Visceral Games, DICE, 2015.
Egyptian Museum, Cairo, Egypt: Museum of Cairo, 1902.
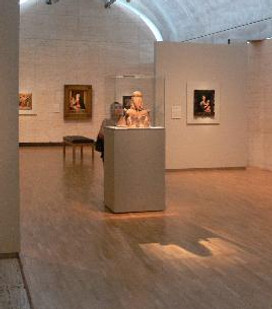
MacKenzie, Frederick, The National Gallery, Pall Mall. London: Victoria and Albert Museum, 1824.
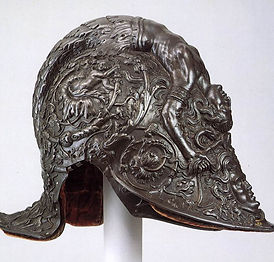
Negroli, Filippo, Parade Helmet. New York: Metropolitan Museum of Art, 1543.
Night At The Museum, Shawn Levy, 2006. DVD.
O'Keeffe, Georgia, Cow's Skull With Calico Roses. London: Royal Academy, 1931.
Payday 2, Stockholm, Sweden: Overkill Software, 2013.
The Third And The Seventh, Alex Roman, 2010. video.
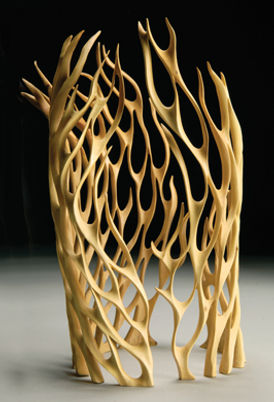
Turner, Neil, 2 Piece Fire. Bunbury, Australia: N.p.
References

 |  |  |
|---|---|---|
 |  |  |
 |  |  |
 |  |  |
|---|---|---|
 |  |  |
 |
The modeling side of my project will be divided in to two main sections and then one combining the two; the first section will be an emphasis on woodwork and the beautiful patterns involved in it. The second section is making the armour. Since the armour will in the center of the room it'll be incredibly detailed and I'll use a large proportion of my time modeling and perfecting it. The reason I'm starting with the woodwork is because the technique used to create those swirls is the same technique that will be used to create patterns on the armour except on the armour it'll be on a curved uneven surface. This gives me a good warm-up and a glance into the future of what difficulties I might encounter. My previous unit also gave me an insight on creating clothing/armour.


The Egyptian museum in Cairo has an architecture that will be ideal for holding a medieval exhibition, even though they house a completely different theme the floor and decoratively chiseled walls are what I'm planning to model for my room.
The floor is out of marble which makes a great contrast to the shades of brown that are being displayed, in my case my exhibitions are mainly steel and so a floor that would contrast that would be a wooden panel floor as seen in the image below.

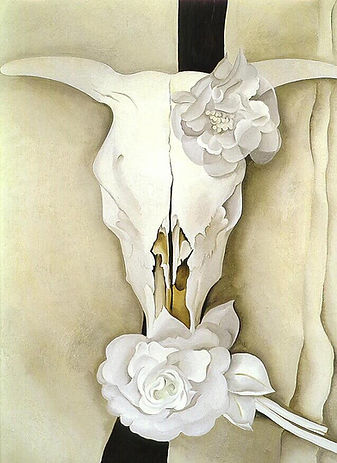
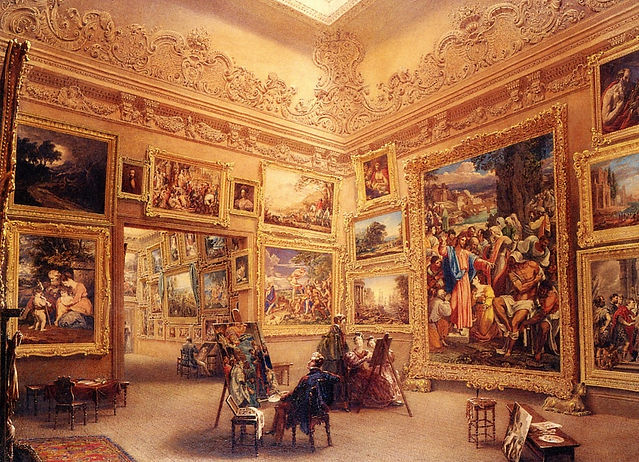
I attended the Royal Academy of Arts in search of inspiration and one painting stuck out in particular. cow's skull with calico roses by Georgia O'Keeffe, as seen on the right. the reason it stood out to me was because of my wooden etchings modeling as the roses reminded me of it. The picture however doesn't imitate reality and is painted to convey emotions therefore studying on how the light interacts with the petals would be inaccurate. I also found myself looking at the ornate architecture of the exhibition, all walls, pillars and ceiling had some sort of pattern etched into it, that was exactly what I would attempt to model although a lot of it was beyond my capabilities. unfortunately the area prohibited any sort of photography so I couldn't take these designs home.
The third and the Seventh is a visualization of a library created in 3ds max, the imagery produced is incredibally realistic and the style of revealing the scenes influenced me in how I aim to reveal my models. The shots are long and very slow, this emphasizes the detail that he went into to create his work.
The museum in the game Battlefield Hardline by Visceral Studios has a really dark and luxurious look. I aim to imitate that feel with by using dark wood textures and adding a high specularity to it. The wall is very simple and smoothly outlines the darker shades of brown wood around it. Through the use of ambient occlusion games and other 3d media use it as a way to conceal and hide away the awkward sudden transitions in two different textures by hiding them in a fake shadow. Ambient occlusion also serves as a way tp make certain objects pop out and not look 2d as surrounding an object in black makes it stand out rather than in an environment of similar colors. This can be seem clearly on the podiums on the left.
Week 1
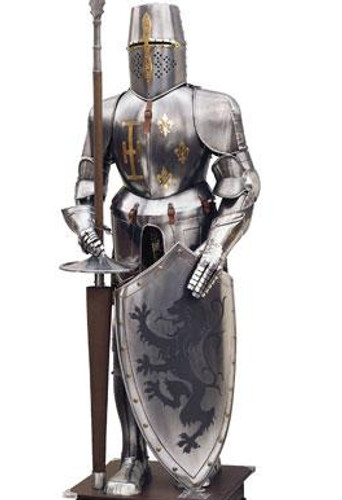
Filippo Negroli is an Italian armour craftsman for exhibition purposes rather than practical use. His crafts were extremely detailed and each piece was a work of art. I'm mainly using him as an inspiration as I'm not going to get anywhere near to his detail as it requires years of experience and a much longer time to create one piece when I have the whole armour to do and the museum room.
I will use a similar technique as I did for the clothing of my game maker project but because of the surface being curved modelling in maya will be much harder, therfore I will experiment with Mudbox and Zbrush which will not only expand my skillset but it'll be much easier to produce something closer to the style of Filippo Negroli.
 |  |
|---|---|
 |  |
 |
Week 2
 |  |
|---|---|
 |
I made the etchings through a technique I found when smooth modelling personal work. I cut out the shape out of a plane which is based off and image, then dragged edges to their corresponding positions. I then make sure that the hyper-smooth understands the shape I'm trying to attain by inserting cuts in between the edge lines to map the slope. Once I'm happy with the smooth I select the exterior edges to extrude them backwards to add depth and bevel the shape to solidify the shape. Now is just a matter of adding some faces to ensure a smooth connection between the edges and the back. If everything looks correct then just permanently smooth once or twice depending on your desired poly usage.
The outcome looks great and is a good reference on how detailed all my models should look.
Below I have recorded myself using the technique I learned to create wood carvings. That piece took me around 3 minutes to complete and is a lot easier to create once you know what to do, but joining pieces together involve using 'union' and merging vertexes.
 |  |
|---|---|
 |  |
 |  |
I participated in a trip to the royal academy in central london for additional research and meanwhile there I took reference images of wall sculptures and other ornaments that will be crucial to my project. I soon realized that with my current abilities I won't be able to perfectly recreate these sculptures as not only will they be hard to re-create, having to UV and texture that will extremely hard. So I must decide on a pattern that balances out so that I will have difficulty modelling but also to make sure it's not totally out of my reach.
Week 3
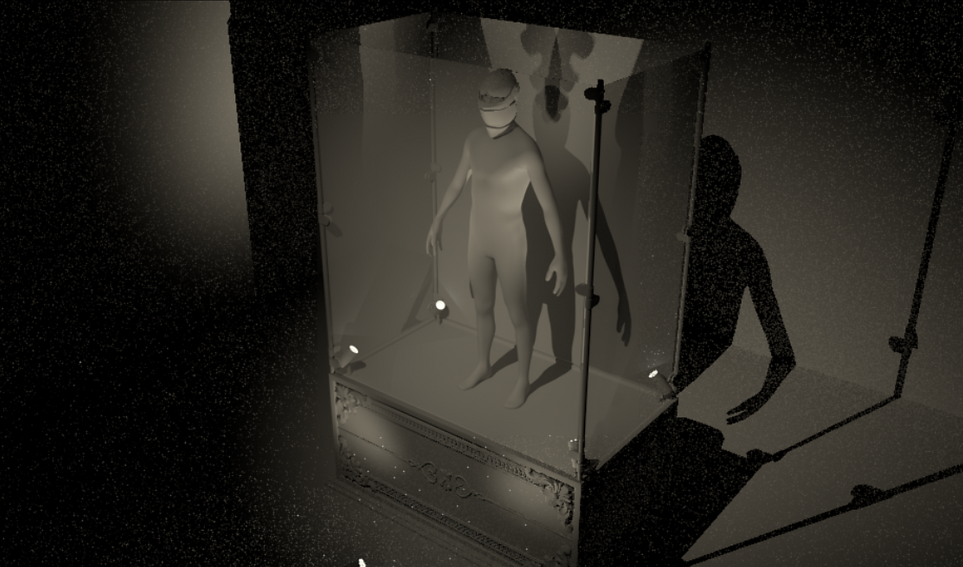
I first created the lights and soon realised that I will be needing several different variations of that same light. To save time I rigged the lighting so I can easily duplicate and modify what it's facing.
When making the glass it was first a very thin cube to give a more accurate refraction and overall realism. I wanted to create some smudges on the glass so I planar UV'd different patterns and ultimately ended with a cloud texture. Making the cloud texture the diffuse of the object would do the opposite effect of a window, instead I applied the pattern to the specular. This gave the great reflection as seen in the top right light reflection. I also made the lighting slightly warmer so it'll show up better on the smudges on the glass.
I was very quickly approaching long render times of 3 minutes on 720p resolution without any textures, bringing in 4k textures from substance painter will considerably increase render time. I soon realised that I will only be able to create a couple of images rather than animation, or I'll have to think of something more creative.
 |  |
|---|---|
 |
Week 4
 |  |
|---|---|
 |  |
 |
My first attempt at the helmet was really unsuccessful as there were irregularities on the surface everywhere, the technique I used was the same as my game maker project; to extrude out of Maya's human model and smooth it out to make it look less like the body and more like clothing. I had to find another way of creating the rough helmet shape and then manually adjust that. after looking at my other smooth works and was reminded of polygon modeling and then smoothing. So I created a dome as the top of the helmet and proceeded to extrude edges to map out the rough shape. I was making sure that Maya understands the shape I'm trying to achieve through constantly proxy-smoothing, once I was happy with the outcome I permanently smooth the shape and soften edge.
I then continued to use my reference image to create the other pieces sing the same technique. Unfortunately I couldn't extract faces off my previous helmet piece as the polygons wouldn't align and would require even more work to maintain a decent edge flow.
Easter Break
Before
After


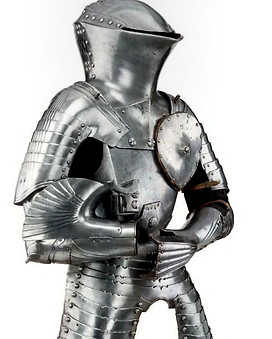
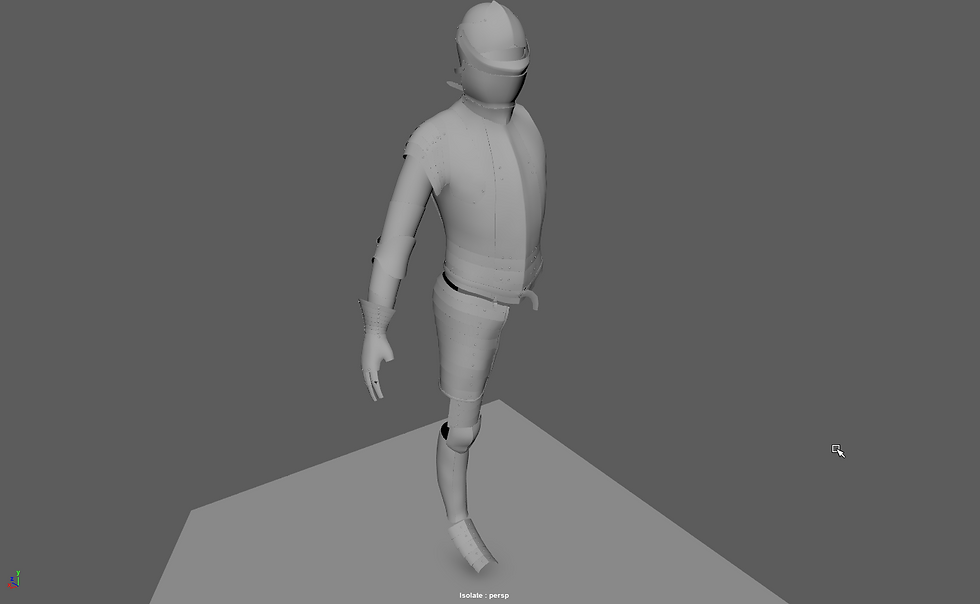
My first task was to model the armour. I started with the chestplate as it's the largest piece and the hardest so I wanted it out the way, though I expected to it to be much harder than what it did. I used Maya's human model and extract its faces to enable a person to fit inside, I then used sculpting tools to make the armour more rounded so that it doesn't just look like a slightly larger torso. I made some fine extrusions and vertex adjustments around the arms, lower torso, and neck.
The chestplate looked very bland so I searched for some inspiration in more fantasy armours and found many extrusions going through the middle and smaller ones going sideways, by adding that to my armour it instantly made it look more attractive to the eye. After that I also decorated the armour with a belt and pins to hold the pieces together.
The legs were mostly form scratch other than the calf part. the whole took a large amount of experimenting to make it look right


The Door


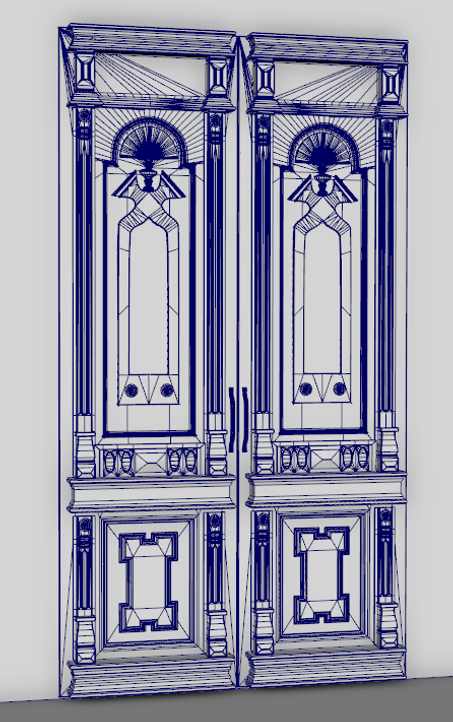
I needed to find a way to decorate the museum room and was reminded of when I went to the Royal Academy that the doors are a lot more decorated than exhibition podiums and so I had to search for a long time looking for an old fashioned door that fits the theme while not using the same etchings as I did in the podium to add some variety and introduce different challenges.
I came across this black and white picture of a ruined old door with just enough detail to look pleasing and not too much detail to take away the attention of the viewer away from the main models. The image was at an angle that with some quick photoshop magic I made the door face straight at the camera at a flat angle. This is to make modeling off an image plain an incredibly easy job. I've had a lot of practice of modeling off image plains as nearly all of my personal work involved this workflow.
The only problem I encountered was modeling the top waved semicircle. getting the average was easy by simply getting a semicircle, dragging every second face and then smoothing. The easy ride didn't last long as the edge flow was terrible and consequently it ruined everything else. The model had non manifold geometry, invalid faces and a UV nightmare. It took a lot of painstaking manual optimization of deleting edges and combining vertexes
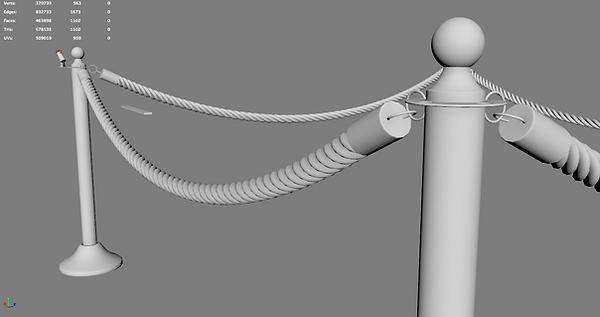

Making the rope was a clever trick which improved upon the usual extrusion along a nurb and sub-division increase. Instead of using one face to extrude I used four cylinders as one object and when extruding along the nurb I added a very large twist which is usually inside the script editor options. You access it by simply pressing twice on the extrusion option window and there you will see twist.
Modeling Yay!
Week 6-7
Lets Get Texturing... or at least prepare
When you start to UV you begin to notice how bad and impractical your style of modeling is. This is because the most common and easy way is to automatic it and the use layout; the first part works great but when it comes to conserving space of you UV grid using layout you'll most of the time get an error that you have non-manifold geometry. When you have non-manifold geometry it means your mesh has a combination of faces that are impossible to unfold and lay out flat, for example if one edge has more than two faces sharing it. Using cleanup you have to identify these issues and manually fix them by rebuilding the area using proper manifold geometry. As I modeled and UV'd throughout my past projects I found myself becoming more efficient in designing models with minimal face area and created manifold models more frequently.
Sometimes you'll find that after bringing thee model to substance painter and baking ambient occlusion that the software cannot understand your mesh at all. you'll have very ugly and obnoxious seams which can be fixed through disabling ambient occlusion but it'll still cause issues for when using smart masks or materials. This happens because the software thinks that there's a really sharp edge in that area and all smart materials will react to the edge even though you are seeing a smooth surface.
I tried to find and fix the issues of my shoulder piece but I couldn't find anything wrong with substance still thinking there's a sharp seam instead of a smooth surface. I decided I'll manually do the UV. I first made a simple planar UV and using clothing as reference I started cutting edges where there would normally be a seam or a stitch, then I cut in some unnatural areas to prevent heavy distortions to create what you see on the right. That UV worked like a dream and painting was just a drag and drop to make a perfect texture. The little pieces at the top are the bolts, I could make them bigger to make use of space but on a second thought they don't need much detail and would only serve to slow down render times.


 |  |  |
|---|---|---|
 |  |  |
 |  |  |
 |

Week 8-9
Hyper-shade-mare
I knew what I was signing up for when deciding to texture in substance painter as there are bound to be problems, though I never expected it to of this scale.
At first exports from substance painter came with a diffuse which only had rust and paint coloured in; the metal was completely black as it was expected to be filled on by the specular map to reflect its surroundings fully. That didn't fully work as it was reflecting but the armour was obviously black. So I went back on painter, modified the arnold preset to export the base colour alongside the diffuse as that would surely fix the black colour. That did fix the issue but them many more were revealed.
Some parts were completely over exposed to the point of being completely white and some being extremely dark with no smooth ground in between.
I started experimenting with Arnold's render options and as I cycled through different lighting options to fix the issue and somewhat minised the problem but I found another problem... At very weird locations where the mesh is smooth it would render with hard shadows as if I had a hard edge, even though I made sure I have a smooth mesh. What did fix the issue was changing Arnold sub-division options to 'Catclark' and the adaptive space to 'raster', what that did is imitate what the mesh would look like if you proxy smoothed, however proxy smoothing causes the whole mesh to be round and therefore areas that are supposed to have a hard edge now had a smooth edge.
At that point after spending multiple painstaking days I gave up and started looking for other solutions on how differently I could display my models. I was thinking on simply using the built in renderer in painter Vray to render my reveal shots, but It has no option to set up camera or light animations so manually moving every frame would be nearly impossible. I then turned to real-time as in the Maya preview the model looked fine, so I could export to sketchfab as it has a direct export from painter, and use their engine to record me manually moving the camera or lighting. Then at the darkest hour a friend of mine reminded me of Unity. Unity has a direct export from painter and so it would work perfectly, and since it's a real-time it would completely remove the rendering process. However I don't have much experience in Unity and obviously it would look worse that Arnold or Vray. After weighing out my options and seeing that with Unity its as simple as a drag and drop to imitate Vray's render in real-time, I decided that having my hard worked textures displaying correctly is a priority and would hopefully overcome the lacking renderer of Unity. So now I had to re-export everything to unity and finally see the results. I find it amazing how Arnold requires 6 maps and still look wrong with a lot of tweaking whereas Unity only needs 3 to work perfectly.
As you can see there are very weird strands of different shades on the armour seemingly coming out of nowhere as none of the maps have these kinds of strands. The image on the left has a fixed specular and roughness map so it should display light reflections correctly, however it's clearly wrong and I had no idea what was causing it. My first idea was that the contrast was too strong so I went into photoshop to minimize extreme areas, but all that did was make the armour's reflection have a lower dynamic range but the extreme lights were still there, less but still present.
At this point I gave up and relied on Unity
 |  |
|---|
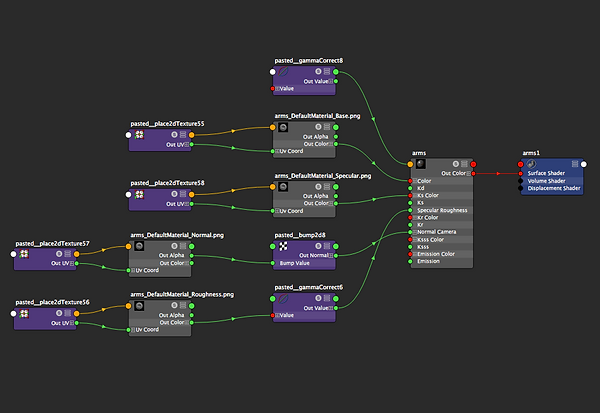
This video showcases the processes I go through when importing textures from substance painter and what problems I encounter throughout. Making more textures is a matter of copy-pasting the node graph then change the directory of the textures to a different texture.
Week 10
SAFE!
So after I re-exported nearly 5 gb of textures for Unity, and in the darkest time I got the new that he figured out how to properly export. With disbelief I try my models and it actually works. It took my two weeks in total to correctly import textures, and in my planning worst case scenario it was going to take a week since I successfully exported before. All textures had to be set as non-tiling with separate gamma adjustments for reflectance at normal and roughness (f0 at 0.45 0.45 0.45 and roughness at 2.2 2.2 2.2). These were the parameters that are mandatory for Arnold to work. The normal/bump map should be set 'Use tangent space as normals', however this caused my models with not the best UV to have obvious seams so I simply avoided using bump maps as it didn't add much anyway and added a lot to render time. It's then recommended to manually adjust the specular colour and diffuse intensity to match your desired output. This also confirmed my hypothesis that diffuse doesn't directly translate to Arnold and it's much better to create an export node in substance painter with the base colour output, this is mainly for metallic objects as you can get away with objects that have little if any specular reflections.

SRGB (Default)
RAW
SRGB colour grading is a thing if the past, it was made in 1996 for the old style monitors that could only display an incredibly limited amount of colours. For our new monitors we can produce a much wider range and especially helpful in CG. The reason sRGB still exists and still is used as the default colour space is because artists are just used to their renders looking that way, adopting a new colour space and having to re-learn lighting would be too much work.
To put how outdated sRGB is: sRgb has around 8 f-stops, the human eye has 20 f-stops, RAW renders have up to 25 f-stops.
F-stops is the measure of how many shades of grey the colour space can render (more is better). This also means that whatever you were rendering in sRGB is going to look really dark in RAW as sRGB's lightest point doesnt even get halfway to becoming RAW's lightest point. A quick fix is to adjust the gamma and exposure of the image however a more practical solution is to know from the beginning which colour space you will be using and adjust you lighting to match your preferred outcome.
The two images above are a simple switch between colour spaces, no gamma or exposure adjustments were made.
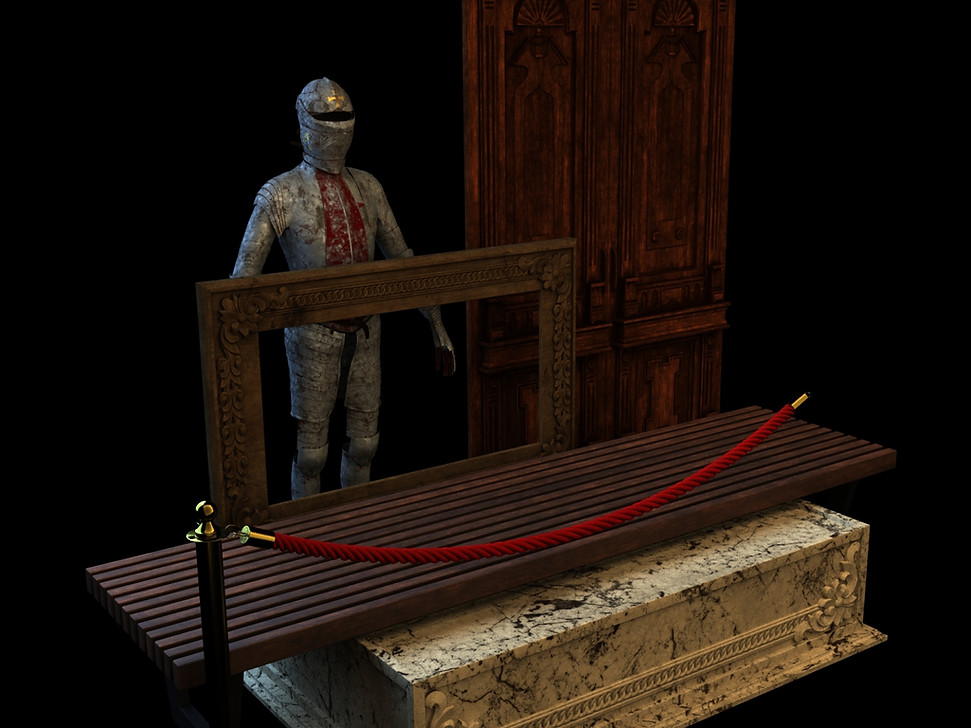
What I call a family render of all my exported models
At this point I found myself going into hypershade a lot more often than I would usually do, for example making a new material and just applying all the correct maps to their appropriate position is perfectly doable without opening hypershade, but using it provides a lot more flexibility and saves a lot of time. The wooden floor that I was working on I wanted a roughness map but was only presented with a specular , so instead of going into photoshop and inverting the image I instead use the same image node as for but I added an invert node and connected it to roughness, works perfectly and I don't even need to waste HDD space by adding more images.

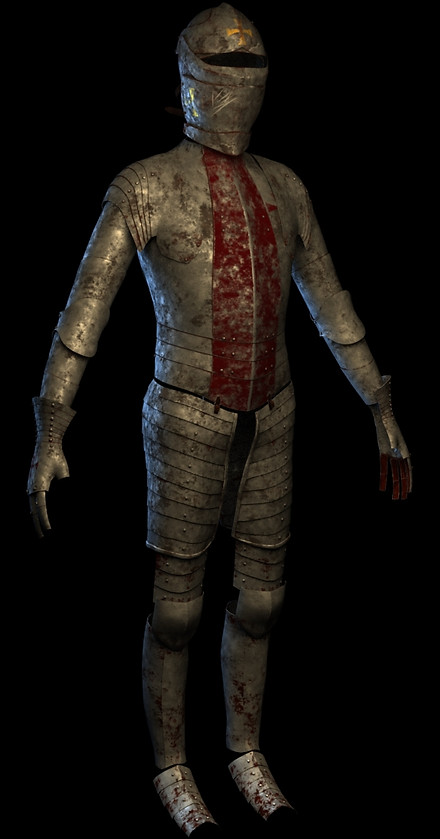
I posed the model to how it'll look on the final shot and added extra props which I will later model.
Yes the pose does look very stiff and animated but this is the best I could make it, any more and it would be either passing through other objects or flying in space. To my defence when you look up armour displays they all look very robotic and artificially posed.
Real armour has a lot more mobility as there are several small pieces that I modeled as one to conserve polygons and it would be too complex that would normally move and allow the wearer for more advanced movements. The video below shows just how mobile you could be while wearing a full suit of armour. Sneaking around is clearly not an option.
In games such as 'For Honor' that tackle the challenge of animating armours of ten cheat in subtle ways. In this case you can very often see the armour clip through itself and deform like skin in nearly every animation. Animating armour realistically is extremely hard as so many little pieces interact differently to subtle movements.
A different example is in the game 'Witcher 3' as the main character carries longswords on his back and takes it out over the shoulder, this is physically impossible as the swords are too long to appropriately take out without external help, the developer tackle this by making the animation extremely fast, making the sword deform very slightly and clip through the sword packaging at the sword's tip.

Pretty hard to see in this gif as you'd have to see in slow motion or in a higher framerate.
For Honor. Ubisoft, 2017. Video Game.
Witcher 3. CD Projekt red, 2015. Video Game

Week 11
A bright Future
After posing the armour I fully modeled the sword and shield, putting them back in to maya was a piece of cake as I had everything already set up. I modeled many swords in the past just for fun, but they all had some fancy aspect in them. Since my armour is based on Templars I had to make an appropriate sword and the kind that they were using is the most simple cookie cutter long sword, I therefore had to make it somehow unique with a straightforward blade. I spent quite some time perfecting the metal brushes so that they line up accordingly, which I later masked out its folder to apply the much shinier damaged edges. Shield..........
I was inspired by how the Witcher 3's title reveal sequence slowly gives away highly detailed abstract shots of the wolf's head. I wanted to imitate that style of revealing a final product in my armour.
The outcomes were instantly looking amazing, tweaks to the exposure and gamma produced a beautiful image and a bright future. The render time is a surprisingly low 1:30.
The image below is an example of the lighting in action as it teases at the sword.
This is why we can't have nice things...
Turning the exposure really low (-0.3 in my case) highlights areas that are in direct light a lot more giving a glare effect, then turning down the gamma just a bit makes the surrounding areas just a bit darker which further serve to highlight the brightly lit areas. The piece of armour to the left is just hinting at what it could be part of.
Turns out rendering a sequence of colour corrected images is a bigger problem than expected.
When creating an image sequence for maya it renders out the images appropriately except they're all in sRGB. My project is built for rendering in RAW colour space therefore I had to find some way around to fix the issue, I looked through all of the tabs in Arnold's render settings and there's no mention of any colour correction even though when you switch to maya software renderer it's right on the top. I had to go to colour management and globally offset the colour space to raw, manual renders worked fine but sequence renders were still in sRGB. I started researching the raw colourspace and found the exact parameters to manipulate sRGB to look like RAW. So in photoshop I tried and successfully imitated raw from an sRGB image, and that means that I can render out in sRGB then in After Effects colour grade the image to look correct. This process doesn't perfectly create RAW images as you're modifying a png file rather than a large exr file which has a lot more data as it can't be directly read by After Effects.
I was starting to think if I could manage to manually render and save approximately 1,000 images.


Week 12
The Finale
The footage above is the raw render footage rendered in sRGB colourspace. The whole render took 103 hours
This is the outcome of colour grading and other effects work, I managed to completely imitate the look of RAW colourspace and even improve in it for my project. I found that even when I was using cold lighting in Maya the images still looked better in a blue hue. Adjustments to curves and some slight glare were made to highlight specularity. Just like in the Third and the Seventh I had made several irregular camera blur to make the product more realistic, this is alongside the custom depth of field. The final image is just temporary as I aim to further expand that area by making slow panning shots of the room.
My aim for the project was to create an armour and a museum room that would challenge and improve my modeling style. The scene and modeling turned out pretty much what I was going for but my style of presentation totally changed, I was expecting to create some animations in my project and make the camera slowly fly around the scene showcasing my work which evolved into focusing more into abstract camera angles and lighting slowly teasing at the final shots.
When starting the project I thought everything will go smoothly as everything I'm doing I've already experimented with just this time it's on a larger scale, however I couldn't have been more wrong as the problems I encountered exceeded all of my estimates.
For inspiration I looked into an Italian armour craftsman named Filippo Negroli as his work goes beyond my 3D abilities but what I was attempting was a very simplified version of his work. I ended up doing a much more simple armour as I wouldn't have had the time to create etchings on the armour. I took some artistic liberties as with nearly all armour exhibitions whats on display is shiny and brand new. I wanted to make my armour look like it's been through some battles and rusted through the ages which would allow me to be a lot more creative in texturing. I attended the Royal Academy of Arts in search of a painting that I can use for my work and, "cow's skull with calico roses" by Georgia O'Keeffe stood out to me because of my wooden etchings I modeled as they reminded me of the roses the painted roses. The picture however doesn't imitate reality and is painted to convey emotions therefore studying on how the light interacts with the petals would be inaccurate. I also found myself looking at the ornate architecture of the exhibition, all walls, pillars and ceiling had some sort of pattern etched into it, that was exactly what I would attempt to model. I was also thinking that I could just paint them in substance painter but with my inconsistent UV the outcome won't look good.
The website I found that displays a bunch of different armours was a huge help as to how I should model my armour, texture inspiration came from medieval games that featured broken down or old armour.
This project was heavily reliant on my ability to create high quality models and very detailed texture work in substance painter, and it work my confidence in 3D keeps on improving with any problem I overcome.
When starting the modeling process, the future looked bright as I successfully created a high quality model that I will use throughout my scene. The project couldn't be going any smoother as even the lighting was looking great. UV mapping the whole set was a pain sometimes as I couldn't get the seam to be in hidden areas without stretching the texture too much. However once the UV was done the texturing process was a breeze and turned out extremely well, further enhancing my confidence in the project. And then the problems started rolling in.
My textures looked wrong, the metals parts were completely black, the specular highlights were completely white and didn't have any mid specularity zone. I spent many painstaking days in hypershade trying to solve the issue. You can find the processes I went through in more detail on Week 8-9. Once through the importing of substance maps was over I had a lot more confidence in using hypershade for all my materials as I found it quicker and more versatile rather than putting in the maps in the material attribute editor. Having learned hypershading the tools at my disposal grew expoantially and my confident to create near photoreal renders too.
I had a very brief sence of peace as another problem was right ahead. I could't sequence render with RAW colourspace which is a crucaial part of my project, I tried solving it by manually changing the camera's parameters then the global preferences of maya to draw the scene in RAW but nothing helped. I finally solved the issue when I too an sRGB render into photoshop and found exactly how I can imitate the image to look like RAW, with the final renders I would use After Effects. I had to quickly re-render some o my shots as they didn't fit in at all with the reveal, however it didn't fully render so I had to time stretch it to account for the timing of the other scenes. Thankfully After Effects has frame blending which allowed me to do this without looking obviously slowed down.
I find my project a success and difficult obstacles are just part of what it means to improve and overcome them .he project evolved in its final presentation technique and I had to cut down on some of the modeling as I would run out of time. I stuck closely to my timetable and successfully completed each small section on time, but because of some problems I was behind on some parts which is also why I allowed for one week leeway in case any obstacles occur.
At this current time the final shot of the armour is just a still image as I didn't have time to create the final panning shots of the whole scene and would hope to create them in the future as the final shot right now is very boring and unsatisfying.